How to Change the Margins in Microsoft Word 2003
Here steps help us to know how to change the Margins in Microsoft Word 2003
Do you have similar website/ Product?
Show in this page just for only
$2 (for a month)
0/60
0/180
How to Change the Margins in Microsoft Word 2003
The standard margins for a Word 2003 document are 1 inch at the top and bottom of the page and 11/4 inch for the left and right sides. Each new document you open in Word had these margins by default. However, you change the margins to suit your document's needs. It often makes more sense to squeeze an extra line or two onto a page rather than use a second sheet of paper.
 Here's how you change the margins in Microsoft Word 2003.
Changing Margins Using the Ruler Bar
You've may have already tried to change the margins of your document by moving the sliders on the ruler bar, probably unsuccessfully. It is possible to change the margins using the ruler bar. You hold your mouse over the triangular sliders until the cursor turns into a double-headed arrow; when you click, a yellow dotted line appears in your document where the margin is.
You can then drag the margin to the right or the left, depending on where you want to move the margin. The problem with using the ruler bar sliders is that it is easy to change the indents and hanging indents when you intend to change the margins because the controls are so closely placed. Furthermore, if you change the indents instead of the margins, you're bound to make a mess of the document.
A Better Way to Change Microsoft Word Margins
There is a better way to change the margins:-
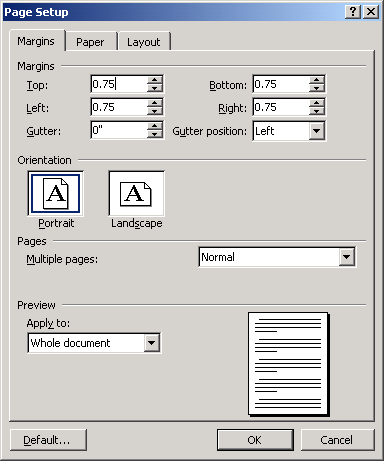
- Select Page Setup... from the File menu.
- When the Page Setup dialog box appears, click on the Margins tab.
- Click in the Top, Bottom, Left, and Right fields in the Margins section, highlight the entry you want to change and enter a new number for the margin in inches. You can also use the arrows to increase or decrease the margins in increments predefined by Word.
- Under the Apply to heading is a drop-down menu that says Whole document indicating the margin change will be applied to the entire Word document. If this isn't what you want, click on the arrow to apply the margin changes only from the point of the current cursor location forward. The drop-down menu will read This point forward.
- After you make your choices, click OK to apply them to the document. The dialog box closes automatically.
Note: When setting the margins, remember that most printers require about a half inch margin all the way around the page to print correctly; if you specify margins outside the printable area of the page, you may or may not receive a warning message when you attempt to print the document.
CONTINUE READING
Microsoft Office- Microsoft Word 2003
Margins.
Kinnari
Tech writer at NewsandStory