How to add a watermark in Microsoft Word
Here Showing step to step guide and Help how to add a watermark in Microsoft Word.
Do you have similar website/ Product?
Show in this page just for only
$2 (for a month)
0/60
0/180
How to add a watermark in Microsoft Word
A watermark placed in a document is used to inform other people that it is a draft document, contains confidential information, or that the document should not be copied. Watermarks can be used for other purposes as well, often in the business world.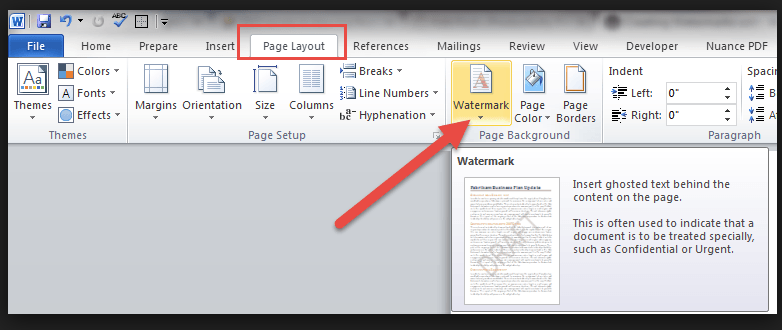
To add a watermark in a Microsoft Word document, follow the steps below for your version of Microsoft Word.
Microsoft Word 2013 and 2016
- Open Microsoft Word and create a new document or open an existing document.
- In the Ribbon menu at the top of the program window, click the Design tab.
- In the Page Background section, click the Watermark option.
- In the drop-down window that appears, find the watermark you want to add and click on that watermark option.
If you want to create your own watermark, follow the steps below.
- In the drop-down window that appears after clicking the Watermark option on the Design tab, select the Custom Watermark option in the drop-down window.
- In the printed Watermark window, select either the Picture watermark or Text watermark option.
- If Picture watermark is selected, find the picture you want to use as a watermark, then click OK.
- If Text watermark is selected, enter the text to use as a watermark, as well as the font, size, and color of the text. Click OK to add the custom text watermark.
- Open Microsoft Word and create a new document or open an existing document.
- In the Ribbon menu at the top of the program window, click the Page Layout tab.
- Click the Watermark option.
- In the drop-down window that appears, find the watermark you want to add and click on that watermark option.
- In the drop-down window that appears after clicking the Watermark option on the Design tab, select the Custom Watermark option in the drop-down window.
- In the Printed Watermark window, select either the Picture watermark or Text watermark option.
- If Picture watermark is selected, find the picture you want to use as a watermark, then click OK.
- If Text watermark is selected, enter the text to use as a watermark, as well as the font, size, and color of the text. Click OK to add the custom text watermark.
- Open Microsoft Word and create a new document or open an existing document.
- In the menu bar at the top of the program window, click the Format menu.
- In the Format menu, click Background, then select Printed Watermark.
- In the Printed Watermark window, select either the Picture watermark or Text watermark option.
- If Picture watermark is selected, find the picture you want to use as a watermark, then click OK.
- If Text watermark is selected, enter the text to use as a watermark, as well as the font, size, and color of the text. Click OK to add the custom text watermark.
CONTINUE READING
Microsoft Office- Word- Watermark
Kinnari
Tech writer at NewsandStory